When installing metal roofing sheets, one of the most important yet frequently misunderstood steps is how to overlap them correctly. Overlaps may appear to be a simple matter of placing one sheet over another, but doing so incorrectly can cause water ingress, structural problems and an untidy finish.
Whether you’re a roofing contractor looking for a quick reference, or a self-builder trying to get everything just right, this guide will walk you through the key principles of overlapping metal sheets – what it is, why it matters and how to do it properly. From types of overlaps to common mistakes and best practice techniques, we’ve covered it all below.
Why Do Metal Roofing Sheets Need to Overlap?
Metal roofing sheets are rarely long or wide enough to cover an entire roof in a single piece. That means they need to be joined together – both side-by-side and end-to-end.
Overlapping your roofing sheets achieves the watertight connection required by the joins. By laying one sheet over another, water is directed to run off the roof naturally rather than seeping between gaps. This protects the building beneath from water damage and helps maintain the integrity of the roof over time. Beyond waterproofing, overlaps also offer additional benefits. They help with wind resistance by securing sheets more firmly, and they contribute to a neat, professional finish.
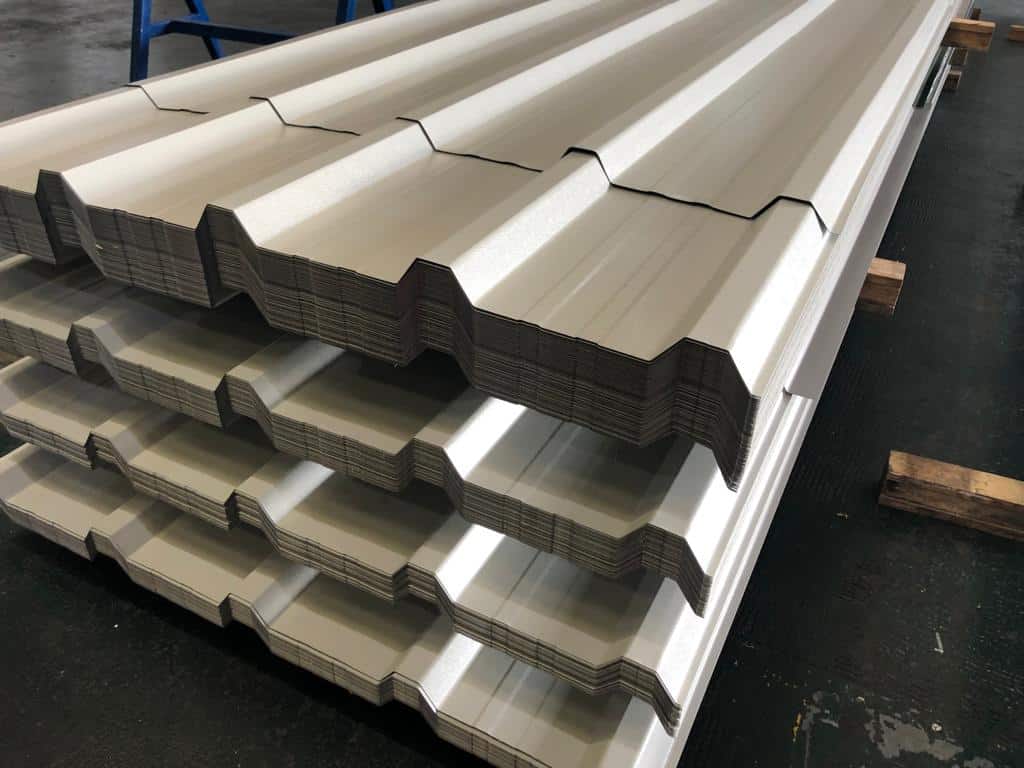
Types of Roof Sheet Overlaps – Side and End
When working with steel roofing sheets, there are two primary types of overlap to consider – side overlaps and end overlaps. Each plays a different role in ensuring the roof performs as it should.
Side Overlaps
Side overlaps occur where sheets are laid next to each other across the width of the roof. The exact amount of overlap required depends on the profile of the sheet being used. For example:
- Corrugated sheets typically require an overlap of at least one full corrugation.
- Box profile sheets generally need a one-rib overlap.
In most conditions, this is sufficient. However, in more exposed locations, an additional corrugation or rib may be overlapped to improve protection against wind-driven rain.
End Overlaps
End overlaps are necessary when the roof measure itself is longer than the available sheet length. In this case, sheets are laid in line down the slope of the roof, with the upper sheet overlapping the lower one.
The typical recommendation is an end overlap of around 150mm for roofs with a pitch greater than 10°. Roofs with a lower pitch may need an overlap of 200mm or more, along with sealing tape or mastic to ensure the joint remains watertight.
How Much Should You Overlap Metal Roofing Sheets?
The required amount of overlap depends on several factors, including:
- Roof pitch – Steeper roofs allow water to run off more easily, which means shorter overlaps are sufficient. Shallower roofs need longer overlaps to prevent water pooling.
- Sheet profile – The depth and design of the sheet’s profile will influence how effectively water is channelled away.
- Weather exposure – In regions with strong winds, heavy rainfall or snow, it’s best to increase overlap dimensions to reinforce the joint.
As a rough guideline however, most roofing contractors work under the assumption that you should maintain a side overlap of one profile or corrugation to ensure proper weather sealing between adjacent sheets. For end overlaps, use a minimum of 150mm when working with pitches of 10° or higher, but increase this to 200mm or more when dealing with lower pitch applications to prevent water infiltration. Always consult your sheet supplier’s specific installation guidance for exact figures, as these requirements can vary depending on the roofing material, local climate conditions and manufacturer specifications.
How to Fix Overlapping Sheets Securely
Fixing sheets properly is essential to maintain the integrity of the overlaps. Here’s a quick guide to help you get it right:
- Start at the eaves and work up towards the ridge.
- Lay sheets in the prevailing wind direction to reduce the risk of wind lifting the overlaps.
- Secure sheets using appropriate roof fixings, such as self-drilling tek screws with washers. These should be driven through the top of the profile into purlins.
- Fix both ends of the overlap to ensure a tight and secure joint.
- Use fixings along the side laps in line with manufacturer guidance, especially on wider spans.
It’s a good idea to pre-drill sheets if you’re working with multiple layers or thicker material, to prevent sheets from shifting or cracking.
Using Sealants and Tapes at Overlap Joints
In some situations, mechanical overlap alone isn’t enough. For lower-pitched roofs or areas exposed to wind-driven rain, a sealant or sealing tape may be required.
- Butyl sealing tape is commonly used between end laps and sometimes between side laps. It’s pressure-sensitive and forms a watertight bond when compressed by fixings.
- Silicone or mastic sealants can be used in some applications, but should be non-corrosive and compatible with coated steel.
Sealants should be applied in a straight, continuous bead and never smeared over the joint – this can break the seal and collect debris.
Common Mistakes to Avoid When Overlapping Sheets
Getting overlaps wrong can lead to long-term damage and costly repairs. Here are just a few common pitfalls to avoid during your next metal roofing sheet installation:
- Underlapping instead of overlapping – Always ensure the upper sheet lies over the lower one, so water runs off rather than under the join.
- Insufficient overlap – Trying to save material by using shorter overlaps than what is actually suitable can compromise weather protection.
- Incorrect fixing technique – Overtightening screws can distort the sheet and lead to poor sealing at overlaps.
- Skipping sealants on low pitches – Even with correct overlaps, sealant is essential on shallow roofs.
- Ignoring wind direction – Overlapping against the prevailing wind can lead to uplift and leaks.
Overlapping with Flashings and Accessories
In many installations, overlaps coincide with roof features such as ridges, hips and valleys. These areas require the use of flashings to complete the waterproof seal.
- Ridge flashings cap the top of the roof and overlap the upper ends of the sheets.
- Valley flashings are used where two roof sections meet in a trough, and sheets are cut to fit.
- Hip flashings cover external angles, while bargeboards and fascias finish the sides.
Flashings should always be fitted in coordination with overlaps to ensure consistent run-off and protection.
Final Thoughts
Overlapping steel roofing sheets may appear straightforward, but a poor installation can affect both the function and appearance of your roof. By understanding the principles of side and end overlaps, using the right dimensions, and securing joints correctly, you can ensure a long-lasting, leak-free finish.
Whether you’re working on a mono-pitch garage or a complex apex system, the key to a reliable roof lies in attention to detail – and overlaps are one of the most critical details of all.
FAQs
1. Can I overlap more than one corrugation or rib?
You can overlap more than one corrugation or rib, particularly in exposed areas, as this will improve wind resistance and weatherproofing.
2. Should I seal every overlap joint with tape or sealant?
Not always. For roofs with pitches above 10°, sealant is not usually necessary. For shallow roofs or exposed locations, butyl tape or similar adhesives are advised at end overlaps.
3. What happens if I overlap sheets the wrong way round?
Water will run under the joint rather than off it, causing leaks and potentially damaging the roof structure.
4. How do I know if my overlap is watertight?
Ensure you’ve followed recommended overlap distances, fixed both sheets securely, and used sealants where necessary. If in doubt, test a small area with a hose or wait until the first rain.
5. Can overlaps be used on vertical cladding as well as roofing?
Overlapping techniques can also be applied to vertical applications too. The same principles of weather protection and secure fixing still apply.