

- Setting out and first sheet
- Side and end laps
- Fixing positions
- Flashings and finishing
Online Calculator
Follow our step by step calculator to get your steel roofing quote direct from Cardinal Steels
Fitting Box Profile Roof Sheets
Box profile is straightforward to fit, and most of the problems people have with it come down to three things: the first sheet going on out of square, fixings in the wrong place, and cutting on site. This guide covers all three.
Before you start, work at height safely. Steel sheets are large, they catch the wind, and they are slippery when wet. Use proper access equipment, plan for edge protection, and do not walk on a roof whose structure you have not checked. Any existing roof light should be treated as fragile.
1. Check what arrived
Count the sheets and check the lengths against your order before anything goes up. Look for transit damage along the edges and at the ends.
Stack the sheets on bearers, clear of standing water, and do not leave them sealed under polythene. Water trapped between sheets stains the coating.
2. Decide the direction
Start at the end away from the prevailing wind and work into it, so each side lap is sheltered by the sheet that follows rather than facing the weather.
On a roof that is visible, this also keeps the lap lines pointing away from the main view.
3. Set out the first sheet
Everything follows the first sheet. Set it square to the eaves and check it, because an error here multiplies across the roof and by the far end there is no way to correct it without taking sheets off.
Let the sheet overhang the eaves slightly so water drips clear into the gutter rather than running back along the underside. Check the overhang is consistent along the run before fixing.
4. Side laps
Each sheet laps over the rib of the one before it. Push the sheet fully home so the ribs nest rather than sitting proud, and check the lap is closed along its full length before fixing.
5. End laps
Where a slope needs more than one sheet, the upper sheet laps over the lower. The shallower the roof, the more the end lap has to do, because water moves more slowly and can be driven back up between the sheets.
This is the reason we cut sheets to length: a slope covered in one sheet has no end lap at all, which removes the most likely leak point in the roof.
NEED HELP? GET IN TOUCH
6. Fixings
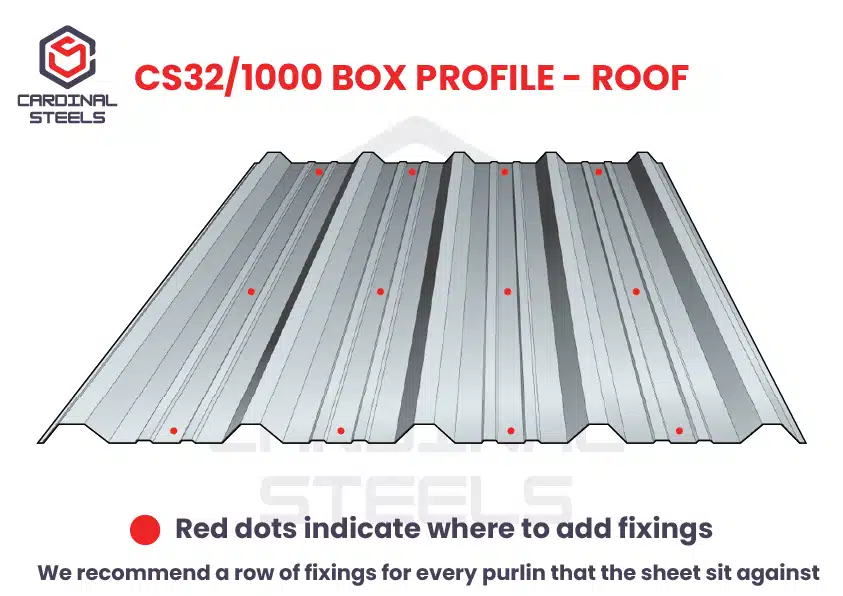
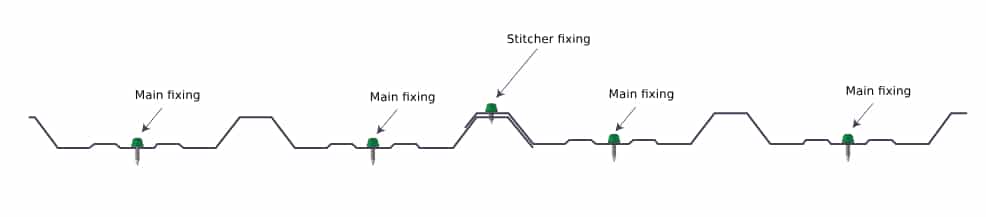
Use the correct fixings for the substrate: the screw for a timber purlin is not the screw for steel. Fix through the profile in the positions shown for the sheet, not by eye.
Drive each fixing square and stop when the washer has compressed and sealed. Overtightening deforms the washer and the sheet, and an over-driven fixing is a leak; under-driven leaves the seal open. Both are easier to get right at a steady pace than a fast one.
Uplift is highest at the eaves, ridge and verges. Those are the fixings not to skip.
7. Cutting
Avoid it if you can, which is why we cut to length. Where a cut is unavoidable, use nibblers or a fine-tooth blade rather than an abrasive disc. A grinder burns the coating back from the edge and leaves hot swarf across the sheet, and both of those go rusty.
Sweep swarf off the roof before it is left in the rain. It will stain the coating permanently.
8. Flashings and finishing
Ridge, verge and wall flashings complete the roof and are what keep water out of the junctions. Fit them in the sequence that lets water run onto the sheet below at every stage. Our flashings and trims are made to suit the profiles we supply.
Finally, check every fixing, clear the roof of debris and make sure the gutters are clear.
Not sure about a detail? Ask us before you fit it, not after.